Introduction
Background information on NPR, shading and comics, and aims of this tutorial.
Non-photorealistic rendering tries to simulate the styles artists use, which includes i.e. for pen-and-ink or pencil illustrations, watercolour drawings and engravings. Users and viewers can benefit from this artificial reproduction. It was shown that making images look less photorealistic enable audiences to feel more immersed and that meaning is more easily conveyed. By simplification and leaving out mess, one can amplify the effect of information relevant to the presentation (“amplification through simplification” [McCl93]). Additionally a wider audience will identify with those characters drawn in a simple style [möHe02].
Comic-Rendering (a.k.a. toon-rendering, a.k.a. cartoon-rendering, a.k.a. cel-rendering) is one of the most vital areas of NPR with practical application in games such as Jet Grind Ratio and Cel Damage and image processing programs such as Live Styles from Viewpoint. It is about the possibilities of how to display a given object in the style a comic drawer would normally produce. In comics, objects are drawn with solid lines (silhouettes) separating areas of different solid colours [möHe02]. There are no soft transitions from one coloured area to the next, but instead sharp edges. This effect is called toon shading.
This work on
NPR is my contribution to the Research Frontiers part of the Advanced Computer
Graphics Class at the Auckland University of 2002. My workgroup focused on the
[Kaln02] paper and its details. Comic-rendering is one fundamental technique
mentioned in that text and WYSIWYG is strongly related to real-time rendering.
Thus I have chosen the topic for my tutorial. WYSIGWYG is the reason for the
implementation in OpenGL and not in an off-line raytracing
method, as one could choose as well for toon shading. For silhouette rendering
there should be an in-depth tutorial available from Qinglei
Meng (qmen002@ec.auckland.ac.nz).Another group member, Yuman Huang (yhua047@ec.auckland.ac.nz), has focused on
stroke synthesis. This topic is challenging too, as there are different types
of strokes in NPR, which have to be synthesized efficiently and are asked to be
convenient to use. For details in both fields you are warmly welcomed to have a
look into the others’ tutorials.
|
Chapter 2 |
Objectives
The
tutorial: extent, content, prerequisites, and expected results.
In this tutorial the question how to do toon shading is covered. We focus on real-time rendering, not ‘offline’ ray tracing. From the current point of research we will see how to create that specific effect of toon shading and what enhancements could be applied. We will talk in detail about which methods and data structures are beneficial to achieve a good toon shaded impression whilst not decreasing the performance of the system.
The student is asked to undertake his own experiments with
the programs he has compiled from this tutorial. Working with NPR is always a
question of using the correct parameters, which normally cannot be found
algorithmically. Thus the student should ‘play around’ with his code and
compose new effects by varying parameters.
The guiding question should be how convenient the
output under the chosen parameters represents the vital features of the object.
Those must be evaluated ‘by hand’ through looking at the result, as it is the
user who should interpret it. We should always keep in mind that real-time
operation is expected, which means that all computations are time critical.
Programming background in OpenGL and C is helpful to accomplish the tutorial
but not compulsory as well as initial knowledge of linear algebra in vector
space.
Taking this tutorial shall show the reader how to
create a simplified scene by the use of toon shading. He is expected to notice
the change in the output, which results in the amplification of the target
features.
|
Chapter 3 |
Methods
Approaches
to the shading problem, data structures, exploiting graphics hardware
Cartoon figures are in contrast to other
characters from our every-day experience intentionally two-dimensional. “Rather
then shading the character to give it a three- dimensional appearance, the
cartoonist typically uses solid colours that do not vary across the material
they represent.” [Lake97] Not using Gouraud’s or Phong’s model which use smoothly interpolating shading,
colour or tone is converted to discrete levels. This section shows the basic
mechanism behind toon shading and will probably give the reader an idea how to
implement the necessary data structures and algorithms, which will be used in
the next section.
For shading in comic representations two common
methods are used: the polygonal areas are filled with solid (unlit) colour,
thus the shading information is lost. Or, in the two-level approach: one colour
represents the lit, the other the shadowed areas. The second colour is most
often a darker version of the one for the main material. According to [Lake97]
“this helps add lighting cue, cues to the shape and context of the character in
a scene, and even dramatic cues. The boundary between shadowed and illuminated
colours is a hard edge that follows the contours of the object or character.”
That’s the reason why some authors call this technique “hard shading”.
The technique used for our toon shader should find
a transition boundary between the lit and the unlit area and then fill each
side with a solid colour. We adopt the formula for diffuse lighting, which
holds for both, the smooth shading and the comic shading shown in Equation 1.
![]()
Equation 1
Ci
is the colour at vertex i.
The variables’ names denote (a)mbient
and (d)iffuse
light whereas the subscripts denote the scope of the variables: (g)lobal,
(l)ight
and (m)aterial. L is the unit-vector from the light source
to the vertex, and n is the unit normal to the surface at i. The extra
factor ![]() in the second cross-product makes the diffuse part of the
term in-significant if the light ray hits the surface in an angle greater than
90°. Than the dot-product becomes negative and the whole term is 0. This is the
case when light arrives from ‘behind’ the surface, which equals to shadow.
That’s exactly what Equation 1 simulates: no diffuse light is added to the
ambient light. The experienced reader with background in computer graphics fundamentals
may skip the next paragraph.
in the second cross-product makes the diffuse part of the
term in-significant if the light ray hits the surface in an angle greater than
90°. Than the dot-product becomes negative and the whole term is 0. This is the
case when light arrives from ‘behind’ the surface, which equals to shadow.
That’s exactly what Equation 1 simulates: no diffuse light is added to the
ambient light. The experienced reader with background in computer graphics fundamentals
may skip the next paragraph.
L
is calculated through the normalized difference of the vector l from
the origin to the light position with the vector p to the object point’s
position in world coordinates as shown in Equation 2.
![]()


Equation 2
Using the inner product of
vector v, which calculates as
Equation 3 shows, does the normalization of this vector.


Equation 3
An obvious approach to achieve cartoon style
shading would be per-pixel procedural shading. But this is not beneficial, as
the today’s graphics hardware does not provide any support for such an
operation. Another option would be a hardware driven tresholded variation of
Gouraud shading. Unfortunately this is not supported either. Thus we have to
make up our minds for a more complex but evenly fast solution for the shading
problem. Instead of calculating the colours per vertex, we create a 1D texture
map of a minimal number of colours. Without any advanced features like
highlights (see later part of this tutorial) this minimal number should be two:
one for the shadowed colour, one for the illuminated colour, as shown in Figure 1.
Note that the transition point between the two colours can be arbitrarily set,
in this case at a value of 0.5, but this influences the appearance of the
output to a great extent: the blacker the texture the darker will be the output
image.

Figure 1
The brighter colour of the
texture map is calculated as if it is directly lit. This means there would be
an angle of 0 degrees between L and n. As the dot product is
equal to the cosine of the angle between the two vectors, the term L·n in
Equation 1 results in the value of 1. The modified equation for vertices with
lit colour is shown in Equation 4.
![]()
Equation 4
Accordingly the shadowed colour for texture map is
calculated. If no direct light contributes to the shading, only the ambient
part of lighting provides irradiance intensity. L·n
is set to 0 in Equation 1, resulting in Equation 5, to simulate this.
![]()
Equation 5
As result we get a 1D texture as shown in Figure
1. It’s computed once per material and stored before the rendering of the
object starts. While rendering each frame we compute Max (L· n)
at each vertex and use these per-vertex values as texture coordinates in our
pre-computed texture map. The current vertex is then assigned with the colour
value found in the texture map. After each image point was coloured
accordingly, the whole image has been rendered.
We have now seen how the
methods which will lead us to our toon shaded object. The next section will
show us how the implementation looks like. After that a few interesting
problems and enhancement are mentioned before we come to the end and results of
this tutorial.
|
Chapter 4 |
Implementation
The methods we have got to
know in the previous section should lead us to the realization of toon shading.
In this section we will see, what steps we have to take to achieve a nice
cartoon shaded object. We will first approach our aim more generally in pseudo
code and then switch to OpenGL and its solutions.
ALGORITHM
Cartoon Shade
Preprocess:
1.
Calculate the illuminated diffuse color for each material:
![]()
2.
Calculate the shadowed diffuse color:
![]()
3. For each material, create and store a one-dimensional texture map with two texels using the texture functionality provided by a standard 3D graphics API. Color the texel at the u=1 end of the texture with Ci and the texel at the u=0 end of the texture with Cs.
Runtime:
1.
Calculate the one-dimensional texture coordinate at each vertex of the model
using Max{L.n,0}, where L is the normalized
vector from the vertex to the light source location, n is
the unit normal to the surface at the vertex, and n.L
is their vector inner (dot) product.
2.
Render the model using a standard graphics API with lighting disabled and
one-dimensional texture maps enabled.
Toon shading pseudo
code according to [Lake97]
From
the pseudo code we can learn that a major part of toon shading takes place before
the actual rendering is done. The reason for that is the different way toon
shading has to find the colour for the vertex, as explained in the former
section. In our example implementation step one and two of the
preprocess are omitted for the sake of simplicity. Otherwise all the properties
of the material have to be known. But in most circumstances this is not the
case.
We starts
with the 1D texture map. It is ‘hard coded’ (part of the code, not variable) as
an array texture and for every object and material the same (in our
scenes there is only one object at time). In contrast to the pseudo code, the
1D structure is expanded to be able to hold all three base colours. In this way
it is possible to store colour and tone in one step. Otherwise we would have to
compute the shading as fraction of black (or white) and then multiply it with
all three basic colours to get the result. That’s far too
slow and unnecessary as the resulting colours are only the two distinct
toon shades.
To use such a texture
one has to create and bind it to a certain variable of type GLuint, a special type of OpenGL. This is done in the init()
method.
glGenTextures(1, &textureID);
glBindTexture(GL_TEXTURE_1D,
textureID);
After this step we must
define how the ‘behaviour’ of our texture should be if mapped to an area where
a texel does not exactly
correspond to a pixel or a whole texture is too small or too big. Such a
command looks similar to the following.
glTexParameteri(GL_TEXTURE_1D,
GL_TEXTURE_MAG_FILTER, GL_NEAREST);
Basically this means that a texture magnification function is used when the pixel being textured maps to an area less than or equal to one texture element and that the value of the texture element that is nearest (in Manhattan distance) to the center of the pixel being textured will be returned.
Finally we really specify our texture image using the type of texture (GL_TEXTURE_1D), the dimensions, the type of colour in it (GL_RGB), the type of texture (GL_UNSIGNED_BYTE) and the structure where the data for the texture can be found (texture). The last parameter is our constructed pre-computed array of data type GLubyte.
glTexImage1D(GL_TEXTURE_1D, 0, GL_RGB, 4, 0, GL_RGB, GL_UNSIGNED_BYTE, texture);
Now we have finished the
pre-computation phase and can go into the rendering. An OpenGL program does
loop all the time, which means, that code bound to so call-back function in
that loop is executed over and over again. We don not have to worry about that.
Each time when the program reaches the part where the drawing is done (display()), we have to get sure that our object is processed
and shown on the screen.
The first step is to
enable the texture functionality and to bind the texture again
glEnable(GL_TEXTURE_1D);
glBindTexture(GL_TEXTURE_1D,
textureID);
In this step additional options can be set as well. But they are not relevant here. The normal lighting is then ‘switched off’ which means that the current lighting parameters to compute the vertex color or index are not used anymore (because we want our own special light which results in toon shading).
glDisable(GL_LIGHTING);
After that our model can be drawn. We read our
model from an .OBJ file, a format which can be written by Alias Wavefront, one of the big 3d modeler applications. The code
for the parser glm.c was
written by Nate Robins. With it we get all the points
and their connections from a file. What we need for the calculation of shading are
the normals. Luckily the parser generates the average normal for each vertex by
itself, so we don not have to bother with the cross-product to get them by
ourselves.
For each group of triangles in the model we
sequentially take the three vertices of one triangle after the other. Then we get
the normalized average normal for each vertex. With this data we can compute a
texture co-ordinate into our pre-computed texture map.
glTexCoord1f(maxNdotL(n,
light));
n
is the normal of the vertex and light
is the vector to the light. maxNdotL is the accurate implementation of
the function Max{L.n,0}. The
command as whole sets the current texture coordinate that is part of the
data associated with the polygon vertex
(our texture!)
according to the result of the maxNdotL(n,l)
function.
maxNdotL(float n[3], float l[3]) = {
if
(l[0]*n[0]+l[1]*n[1]+l[2]*n[2]) > 0.0)
then
(l[0]*n[0]+l[1]*n[1]+l[2]*n[2])
else 0.0; }
Thus the colour of the vertex is found and the
vertex’ representation written to the screen. After all the faces with their
vertices were processed the whole patch is done and the object has been
rendered.
The last step is to disable texture mapping and
switch on lighting again. This is necessary because other objects may need
another environment and other lighting conditions. Without explicit
deactivation they would be trapped in the current configuration.
Our methodological
reflections in the beginning of this tutorial have guided us to this nice
implementation of toon shading. Fur further details in OpenGL see [OpenGL]. Figure
2 shows a possible outcome of the algorithm. Here we have three colours in the
shading, one depicts highlights. This seems more elaborated but it is easily to
be done, as you can read in the next section.
Figure 2: Two
results of the algorithm
|
Chapter 5 |
Reflection
Problems,
enhancements, variations & further research
Problems
NPR
techniques typically seek to realize three effects: tone, texture and outline. A
minor general limitation in comic rendering results from the fact that tone and
texture can’t be completely separated and independently used to impart
knowledge or meaning. In comic renderings tone overrides texture as it’s only a
solid colour which fills a whole area and hides further detail. Furthermore
outlines are drawn using different strokes. It might appear as if they have
texture (one might think of broad pencil strokes) and convey tone (because the
cover a reasonable part of the canvas). But one must ask oneself if this is not
a direct conclusion from the basic approach NPR takes: amplification by simplification.
Information is omitted so one can expect a certain amount of detail is left out
which benefits to the impression of the image as comic rendering. Recognized as
such the viewer will not expect high detail and will gain another view on the
image on the world behind it. The open question is how many features have to be
absent or how many could be still present till the viewer depicts the image as
comic like.
The hugest
obstacle with the implementation is to overcome the current OpenGL
specification. Today’s graphics cards support OpenGL instruction on a hardware
basis. They do not include any native NPR algorithm, but new code must be
implemented in the application by the developer. This has the main drawback
that user code is never executed as fast as hardware implemented routines.
Additionally the design of applications would be eased and software engineering
matters such as interoperatability would be more
conveniently met if NPR algorithms were included. “Our texture-mapped method is
equivalent to per-pixel colour tresholding. Without
texture mapping we would need either hardware-supported per-pixel procedural
shading or a tresholded variation of hardware Gouraud shading to achieve the same fast results.” [Lake97]
The algorithm calculates a dot product at each vertex for every frame. With the
current processors available this is done fast enough to ensure interactive
display rates on scenes with realistic geometric complexity. But the dot
product is calculated twice: once in our application, a second time in the graphics
hardware for lighting. With a pathway from the lighting to the texture
subsystem and an automatic texture-coordinate generation mode this double work
would be omitted. Have a closer look at [Mohr02] for opportunities how
to overcome some of the other mentioned limitations of OpenGL. It’s proposed there to directly
intercept the graphic’s pipeline stream which would make NPR styles possible
and fast at the hardware level.
The colour
quantisation or texture-mapping can lead to stair-case effects or to fuzzy-borders.
Therefore one aim is to get smooth transition borders between bi-tonal coloured
regions of the object. One solution is to refine the whole object and decrease
the size of the faces. In fact that does not really solve but only shrinks the
problem and reduces the performance noticeable. Texture mapping gives either to
aliased results or has too fuzzy borders between the cartoon-colours.
Enhancements &
Variations
The just mentioned problem can be handled by sub-division of a face,
which has more than one colour at its vertices, according to [Claes]. If i.e. a face with three colours exists, it’s
sub-divided in three triangles. The new vertices are found by linear interpolation
of the colour values along the triangle edges. The new face is assigned with
the colour of the closest vertex.
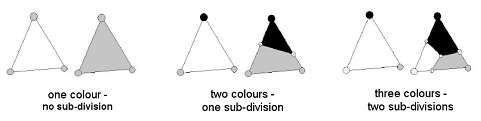
Figure 3: Different
types of subdivisions.
The result of a successful
sub-division process is shown in Figure 3 and applied in Figure 4 and 5.
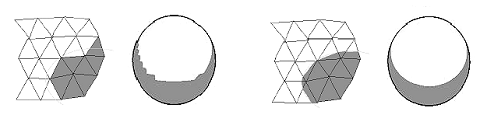
(a) (b)
Figure 4: Principle
of polygon subdivision. (a) without (b) without
subdivision. Result on a sphere.
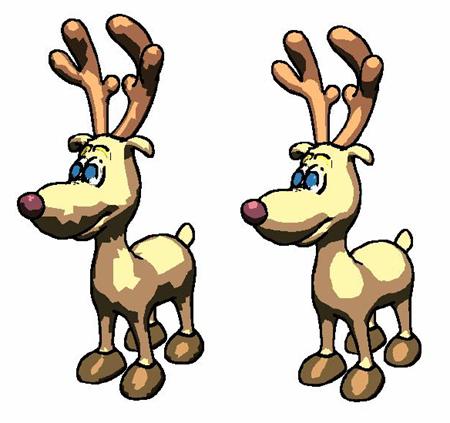
(a) (b)
Figure 5: A deer
rendered (a) without and (b) with subdivision.
A second method may help if
transition borders of textures still look jagged if viewed closely. Depending
on the geometry and the viewing condition texture filtering can have benefits. It smoothes the colour transition by a linear interpolation among a
set of texels (texture elements) nearest to the pixel.
To enhance
NPR drawings even more, we use the fact that silhouettes and creases with “higher
levels of anti-aliasing produce better results. Insufficient anti-aliasing is
particularly noticeable where ink lines are drawn: the lines chatter during
animation.” [ClaeXX]
An (still) example is shown in Figure 5.
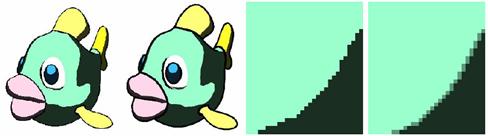
(a) (b) (c) (d)
Figure 6: A rendering
(a) without (b) with anti-aliasing turned on. (c,d) zoom-ins in (a,b)
Additional effects can be created by using other
texture maps, i.e. with a higher resolution. In the case of a two-colour
texture map, more texels can provide flexibility in the location of the shadow
boundary. Let’s say that three out of four texels are assigned with the
background colour and only one with the foreground colour (Figure 4).

Figure 7: texture
map with four texels, giving the ‘dark comic’ style
Rendering
an object with this map will give a result which appears to be more darkened
because more pixels are set to the shadow colour than to the illuminated
colour. Such setting can help to imitate a dark comic book feeling. Another
rewarding option is to design the texture map with both ends in illumination
colour and only the middle in shadow colour. This will lead to the effect which
is normally achieved by double source lighting.
The two-tone method for cartoon shading cannot
display any highlights in the image, but it can be modified to do so. The 1D
texture map is expanded to three colours by an additional one for the
highlights. For convenient results we again use a higher resolution texture
map. At the one end of the map a small portion of the texels is set to the highlight
colour, at the other end a huge amount is assigned with the shadow colour and
the rest in-between with the illuminated colour, as shown in Figure 5.

Figure 8: texture
map with four texels, giving a highlight colour
The
highlight colour can be chosen automatically by multiplying the standard object
colour with a certain factor. As the highlights resulting from this technique
are viewer independent, we call them “diffuse highlights”. To introduce viewer
dependent specular highlights a second texture map has to be added. The appropriate
texture coordinates for the new map come from a viewer dependant specular
computation rather than from a diffuse one as above. The first and the second
texture are blended together in a single rendering pass using multi-texturing, which
is supported by today’s graphics hardware.
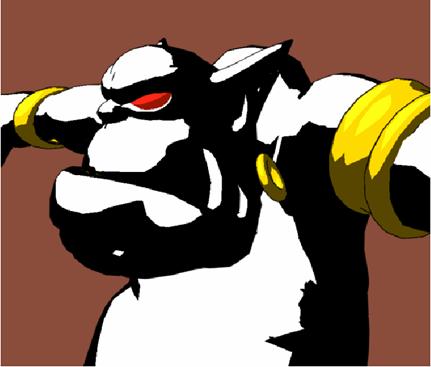
Figure 9: Olaf in ‘dark comic’ style with highlights shown
In contrast to other NPR techniques, which
typically aim on the creation of tone, outline and texture, the basic comic
rendering is only designed to achieve the first both effects. Texture is not
introduced, which might have been deliberately avoided to contribute to the
simple appearance of the characters and all the related advantages. But one
could thing of situations in which texture might aid to distinguish objects
quickly, e.g. if the scene becomes to complex to be rendered with just two
colours per object. One possible solution for this problem could be to use a 2D
texture map which would provide a real texture, not only a colour. Another
solution could be to use procedural textures and map them to the object’s
surface. Both solutions alter the shader which then still works real-time.
Differently Halper et al. [Halp02] propose a way how
to incorporate different NPR styles in one interface. Their approach is more
general in terms of methods covered but is restricted to still images.
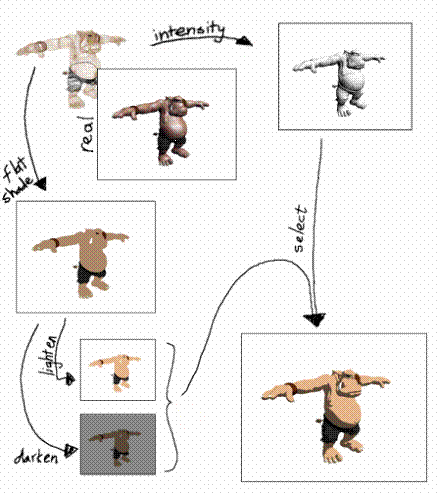
Figure 10:
Step-by-Step shading of Olaf
With little
modification the proposed solution for comic shading can be used to create
pencil sketch drawings. The original algorithm is extended to handle
two-dimensional textures. The inner product of light vector and surface normal
is used to select a texture of appropriate density. Less light corresponds to
more density and vice versa. Because this is a little out of scope I have
mentioned it just shortly. For deeper insight have a look at [Lake97].
This section
has made clear, that there are certain problems existing in the field of comic
rendering and in particular for toon shading. Some of them are relevant for the
implementation; some of them have a more general meaning in NPR. The reader
should have noticed that there is a wide variety of enhancements and add-ons to
toon shading and comic rendering which we were not able to cover here in
detail. For further information have a look in the sources mentioned at the end
of this tutorial or in the bibliography.
|
Chapter 6 |
Results
& Conclusion
In this
tutorial we gave an introduction to non-photorealistic-rendering, what is does
and how it works. We picked one distinguished style, comic rendering, and had a
closer look at the method and implementation behind on of its parts: toon
shading. As we could see, toon shading only makes no comic renderer.
It’s complemented by silhouettes and motion line rendering[1]. The last section explained the
current and general problems, but showed what enhancement could be applied to
toon shading and comic rendering, both in methodical and computational terms.
For me it
was great joy to see what can be achieved by simplifying images and how it is
done. As one technique among other, toon-shading is in principle not that
difficult and should be easily understood. This property makes toon-shading a
good entry point into the world of NPR. Consequently I wrote the tutorial. It
probably encourages the reader to undergo further training or research in the
area. I believe that artistic rendering, as NPR is called sometimes, can
provide an interesting, helpful and fun way to convey complex correlations to
the limited human perception. It facilitates and supports understanding! This
is fascinating. It seems simple in the beginning but when you go deeper you
will find a lot of unsolved questions. These problems give you an idea about
the potentials behind comic rendering and NPR. This potential is the area I
want to explore in future
I hope that this tutorial has
provided an attractive way to learn a bit about comic rendering. If you want to
achieve more expertise in NPR and its related techniques the most appropriate
places to go are Craig Reynolds’ or Amy Coochs
pages with an overwhelming bunch of links to almost each and every adjacent
topic: http://www.red3d.com/cwr/npr/
ACM SIGGRAPH,
the biggest annual conference on computer graphics, is a good resource for
further research too:
Thank you for your attention!